Showing posts with label OPI. Show all posts

Friday, August 21, 2015

Friday Beauty - Fall Makeup Transition

 Transition. It's a word we use in fashion when moving from summer to fall. When talking about transition, we generally talk about how to transition our wardrobe from one season to the other and how to utilize the contents in your closet to work both seasons to your advantage. Today, instead of talking about how to transition your wardrobe, I thought we would focus on how to transition your makeup.

For summer, I add brighter colors to my lips and nails. And, I go one step further and brighten up my eyes as well. I tend to go with pale purples, creams, and taupes so that my overall look is lighter. But when fall rolls around, it's out with the pinks and in with the reds and bourdeauxs.

So what should one do when it's mid August and your starting to mix olives and navys into your daily look? It's time to start wearing richer tones. You don't have to throw out the pinks or reds. Actually, one should NEVER throw out red. Instead, reach for a pink in a more raspberry tone and reds that move toward maroons. 

 Below are my picks from my own makeup bag! Take a peek.


Laura Geller Beauty Color Drenched Lip Gloss in Raspberry Roast/MAC Ruby Woo/
NARS Shanghai Express/MAC Kissable Lipcolor in Flaunting


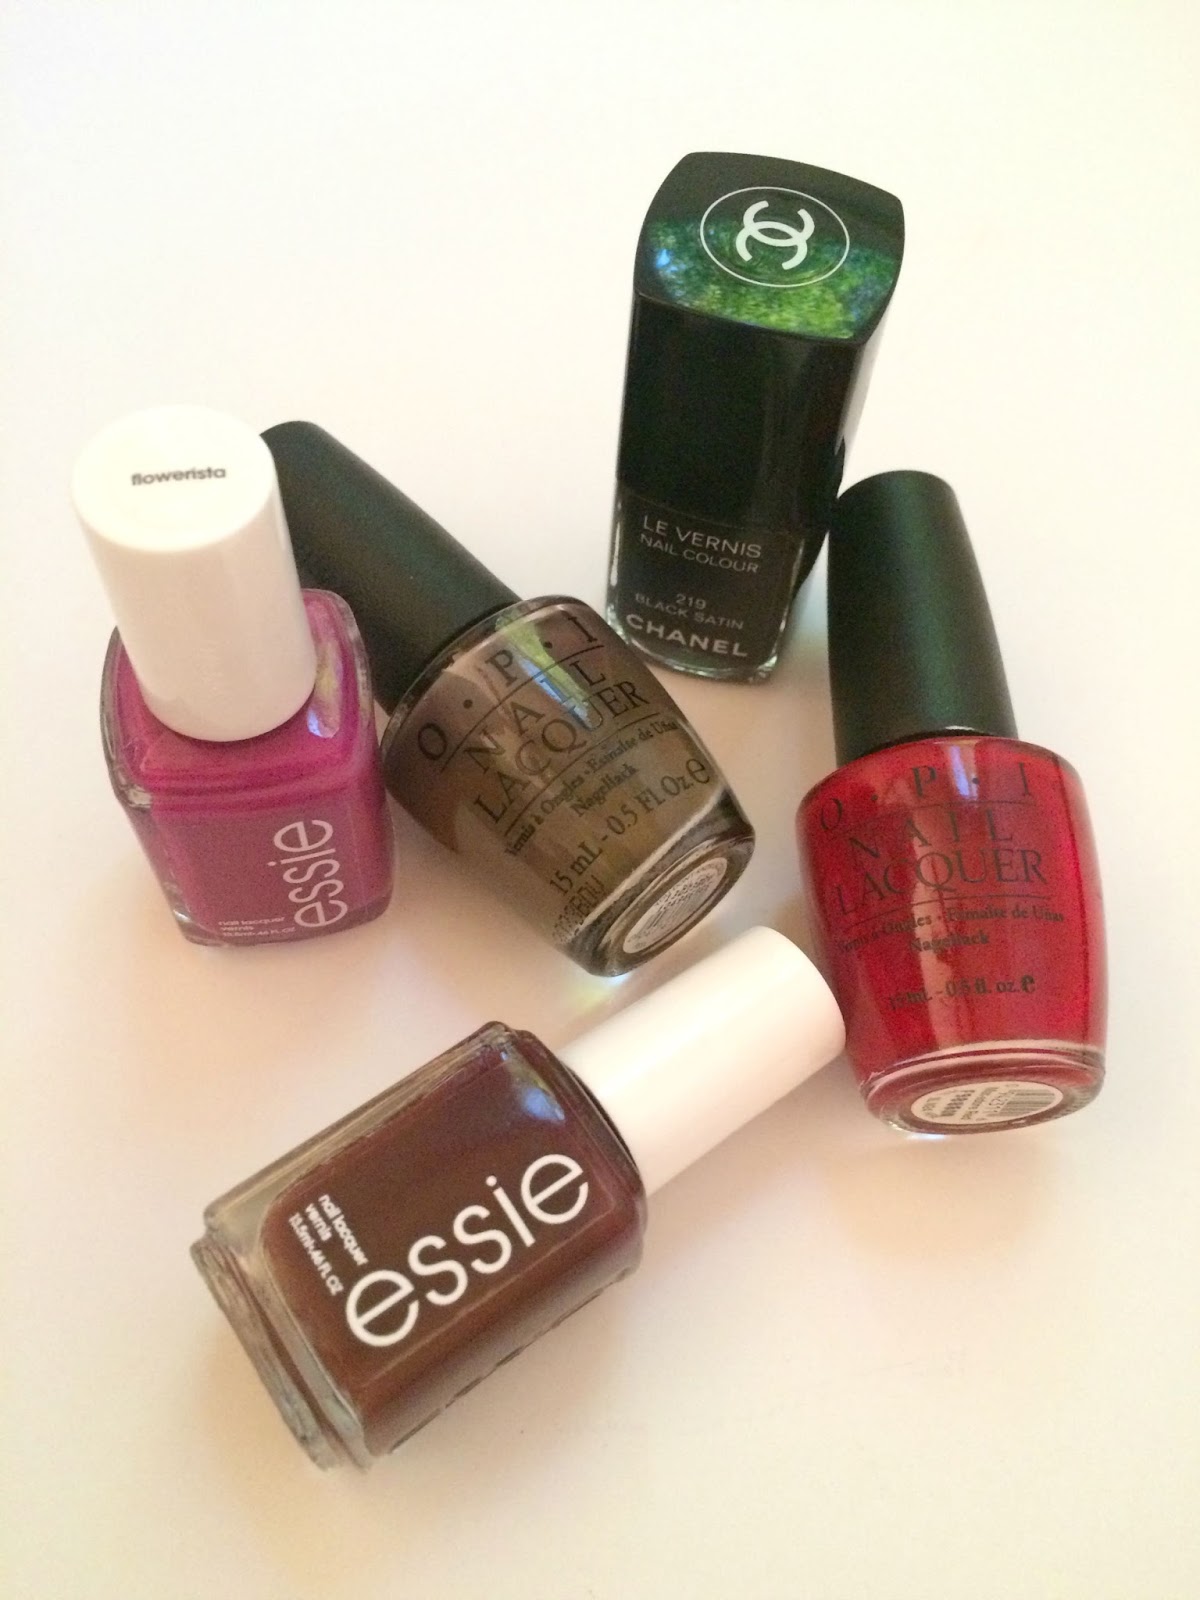
ail color is another great way to transition your makeup. My favorite fall color, although I do wear it all year round, is OPI's "You Don't Know Jaques". But I also love dark reds and black!
 Essie "Flowerista"/OPI "You Don't Know Jaques"/Chanel "Black Satin"/OPI "Mat-adore Red"/
Essie "Shearling Darling"

 Lastly, it's all about the eyes! I love dark browns and olive tones. Mixed with black liner and several coats of mascara, all eyes will be on you! 


 Laura Geller Beauty Creme Glaze Trio in Golden Set/Chanel Les 4 Ombres Tentation Cuivree/
MAC 6 Devil May Dare Warm Eye Shadows


What is your favorite way to transition your beauty from summer to fall? Do you go with richer colors in deep shades or do you continue to use brights all year long? Let's discuss!

Happy Friday, Beauties!

Tuesday, June 30, 2015

My DIY - July Fourth Nail Art

I'm not sure if nail art is still on trend, but I still like it! And, I like to dabble in it. But I'm not very good. They say practice makes perfect, but I don't have a whole of time on my hands....pun intended! So I drew some inspiration from Pinterest and decided to give a couple of cute nail art styles a try. 

Here is what I used:


For the first round, I used OPI Red, Essie Blanc, Essie Butler Please, and Revlon Night and Degas. I painted the majority of my nails red, using my ring and thumb as my accent nails. Those, as you can see, I painted with Blanc. I used the Revlon Night and Degas to create the stripes and totally went free hand. If you want a more professional look, tape off the stripes and paint. Just like you would a wall. I dotted the white accent nails with Butler Please and OPI Red. And that's it. Super simple and kind of cute, no?


For the second round, the only color I didn't use was the Revlon polish. But, I added Nicole by OPI  Rainbow in the S-Kylie. (I think this might have been from the Kardashian Collection.) I randomly polished nails in the red, white and blue polish, and went back over them with the glitter. I love how it gave them a little firecracker look! Or sparklers. I love those things!


 And last year, I did this cute design. A little here and a little there. A fun pattern that was totally whimsical!

My fun Fourth of July nail art! http://akstylemyway.blogspot.com/

With the fourth fastly approaching, would you give these nail art designs a try? If you have already, please share! I love to get inspiration from others!

Here's to the old Red, White, and Blue!

Tuesday, July 15, 2014

DIY Nail Art - Baseball Inspired Pedi


As most of you know, and for those of you who don't, I am a huge baseball fan and I am serious Kansas City Royals fan! We moved to Kansas in 1982 and started attending games during the summer of 1983. We cheered the Royals to victory during the 1985 World Series, and even after we moved away for numerous years, we remained die hard fans. I've been back in Kansas City for seventeen years and continue to head to The K as often as I can.

So when I was approached by Julep to participate in their "summer DIY pedi competition", I didn't have to hesitate with my answer. I am a fool for contests, I love to paint my nails, I'm totally into nail art, and I'm all about saving some money these days by doing my own. With so many amazing products on the market, you don't need a nail tech. You just need these awesome tips from Julep, a steady hand, and plenty of time to create! Also, check out their newest nail polish color page!!

 This past weekend, we attended a Sunday afternoon game, and since my toes needed a fresh coat of paint, I decided to go for a baseball theme. The Royals logo above was my inspiration, and since the All Star game takes place tonight, it's only appropriate that I post this DIY tutorial today! Below are the colors I used:

Base/Top Coat: Sally Hansen
OPI: OPI Red
Essie: Butler Please
Revlon: Night and Degas
My own paintbrush

You will also need nail polish remover and something to clean your brush with like a cotton ball or piece of tissue. Remember this post?


I painted all of my toes with Butler Please, which is the perfect royal blue. And I love that it's Butler Please. We really need Billy Butler to step up to the plate in the coming weeks....PLEASE! 


Obviously the next step is to let them dry! Once that's done, I needed something to help me outline a circle for the baseball. I originally thought of using a piece of three ring binder paper. That circle would have been perfect. Or the reinforcer we used to use when that piece of paper ripped. Please tell me you remember those? Then I found this awesome stencil.

I made sure the circle was centered on my toe and then....


 I used the Degas white and put just enough color on the brush to help make the outline of the circle. And don't worry if your circle isn't perfect. You can go back in and clean up the lines with the Butler Please and your thin paintbrush. Trust me, I did just that with this one!


 While I let the circle dry, I moved over to the other foot and worked out the design for the KC. Let me tell you, creating the letters backward was tough! But, I thought they turned out pretty well. Again, I used the Revlon Degas, the thin brush is perfect for this kind of project, and simply took my time. And, once I had the letter down, I really tried not to go back in and mess with it. That can just make it worse.


Whenever I think of the letters K and C, I'm always reminded of the line from FRIENDS where Ross is taking a message for Rachel. "Is that like Casey at the bat or and the Sunshine Band?" Again, another baseball reference...


So while the KC and circle continued to dry, I just started designing each toe with a different pattern. I went with polka dots, chevron stripes, and stripes that were horizontal and vertical. And once the circle was dry, I went in on the stitches of the baseball. Those were a lot harder than I expected! Again, I made a few minor mistakes, but was able to easily clean them up with the tiny brush in the Revlon bottle.  

Instead of using the giant brush that came with the OPI bottle, I went for the very thin paintbrush. And I used tiny amounts of polish as I didn't want it to run or drip all over everything I had done so far. And again, take your time. Be patient and try not to go back over it too many times. 


And there you have it! The finished product post game. And my post game relaxation, while my son napped and my husband mowed, was putting my feet up, drinking an iced cafe mocha, and diving into my new Danielle Steel novel! It was a prefect end to a perfect Sunday afternoon.


What do you think of my DIY pedi? I am so happy with how it turned out. I'm having such a great time with this competition, and I'm already scheming on my next nail art creation. Stay tuned! I can't wait to show you what I've done and how you too can create it at home!

And in the words of my son, "Royals, clap clap. Royals, clap clap!" A die hard fan at three. I love it!

Thursday, December 19, 2013

DIY - Holiday Nail Art

I wish I had time to do more nail art because I love it! I'm not much of an artist, and freehand isn't my thing, but I've had fun playing around with glitter and other small details. With the holidays around the corner, I really wanted to do something cute. I thought about a Christmas tree with colorful ornaments. That so didn't work! But some other things did. Here is a little photo tutorial for you. I wish I could have taken photos of actually painting the nails, but I didn't have Joel (or a third hand) so you get before and after and a few tips...no pun intended!

Here is what you will need. A ton of nail polishes to play around with, a few paint brushes, polish remover, and a steady hand.


Because I want the art to be the focus, I opted to paint that nail a very neutral color. Essie's Ballet Slippers is the perfect color! Also great for a classic mani. (I only painted the nails I was going to experiment with.)


I started with a Santa hat. I used OPI Red. It's pretty much the perfect Christmas red, don't you think? I used a thin paint brush to make a triangle and then filled it in using the same brush. 


Below is the brush I used. It's pretty thin.


I used Revlon's Night and Degas for the ball and fur on the hat. I used the actual brush that came with the polish. You don't need to load the brush full of polish. Just use a small amount and build up the volume you want.


Next up, I decided a little snowman would be fun for later in the winter. Using the same Revlon white polish, I made three circles one larger than the other. Like an actual snowman! I used Essie's Butler Please for the scarf and I used the same thin brush as before. Just brush on the polish to resemble a scarf. Next time, I won't use the black to make eyes. I don't think they are needed. Now, this where the polish remover comes into play. I poured a small amount into the cap to clean the brush between paintings. 


 Lastly, I made a little holly. I used Essie's Mojito Madness and OPI Red. I thought it turned out pretty well, but I will definitely add a little more red to make it a little darker and a little more defined. I used the thin paint brush for both the leaves and the berries.


After all was said and done, I went with the Santa hat. It looked the most natural and perfect for the season at hand...again no pun intended! I can't wait to experiment more with nail art. I'm not sure I could ever move beyond my left ring finger. I can barely paint my right hand, let alone try to doll it up! Maybe something to try and accomplish in 2014.


What do you think? Are you into the nail art trend? If so, would you attempt this at home or pay the pros? To be honest, I don't know a salon in town that does this so if you do, pass it along! I would love to know who you trust.

Happy Holidays!

Wednesday, July 18, 2012

Keep, Toss or Giveaway?

My friend Tina started a blog, Tina's 100 Day Challenge, and I've been inspired! She is challenging herself to get rid of one item every day for the next 100 days. It might be a set of something but it is still considered one item for that day. As I look around my house, I see plenty that I can get rid of, starting with my bathroom! Now, this is just one cleanup effort of several, but its start!

My nail polish collection was running a muck! I love nail polish, but I needed to get real about the amount of polish I actually needed. See below the clutter that I was facing!


And then there was this drawer!! A drawer that I literally threw anything and everything into that I wasn't sure what to do with.  As you can see, it was just a tad cluttered. So, I pain painstakingly went through each item and made piles; keep, toss or giveaway. Because it's makeup, how could I possibly giveaway you ask? It was stuff I've never used! Lipsticks that were samples from bonus time giveaways that I knew wouldn't work on my skin tone. Lipglosses for the same reasons. And, all of the polish from above that never gets worn, or I had in similar colors, made the giveaway pile as well.


Below is the outcome. I took little baskets that were already under the counter and used them in the above drawer. I've dedicated this drawer to all nail polish and I've tried to organize it by color. Now, I can open my drawer, find the color I want, and apply. No more opening a cabinet door and prowling through endless bottles to find the one I want. I am super happy with the result.


And why stop at the bathroom clutter? I moved on to the jewelry drawer of my dresser. As you can see from the two photos below, I had a mess of jewels that I sort through on a daily basis. I'm often asked, "how do you remember what you have" and from the looks of things below I'm not sure either! I literally opened every black bag to find the piece I was looking for. Super inefficient!  I scoured the organization aisle at Target last weekend to see what I could find. And....


I found these awesome individual compartment dividers! I would have preferred to have them all in black, but I do love how the hot pink adds a little color each time I open the drawer. And now I can see everything I own! And, like in the bathroom, I've made my "giveaway" pile but this time I plan to consign. Why not make a little money off of my bling, right? (Side note: I have now dedicated two small drawers in my dresser to my jewelry. Once a sock drawer that was cleaned out and placed elsewhere, I have doubled my jewelry space.)


Have we inspired you to do the same? If so, let me know how you organized your things for a more functional you! Up next....the dreaded closet organization! I need an entire week to get that completed. I did, however, purchase new hangers. Stay tuned!